Docker Series: Docker Network

Table of contents
With its options selected in advance, Docker enables containers to easily get started for people who are just getting familiar with the concept of Docker containers. However, there is a wide number of options which can configure additionally. For example, a network within the container.
When we run a container without specifying which network it belongs to, it will be included in the network that was previously created by Docker named bridge network. Bridge is a private virtual network created by Docker. Each network which Docker created in advance or that a user created afterwards for their own needs by using Docker is connected to NAT Firewall on the operating system of a computer where Docker was run. Docker will do all the necessary configuration so that all the created containers could be connected to the Internet.

Milan Deket
In the previous post, we gave a few examples with nginx where we used option -p while running the system in order to open port, that is to redirect the traffic from operating system on a specific port to a specific port within a container. In case we want containers to communicate with each other, there is no need to open ports because we might create a security issue. To communicate with each other, two containers must be within the same network. The number of networks that a user can create is unlimited, which means they can have one network per application, that is a container. Likewise, a container doesn't have to be connected to any network.
There are many different kinds of networks, that is drivers for a network. The basic drivers which are supported by Docker out-of-the-box are:
- Bridge
- Overlay
- Host
- Macvlan
- None
You can find more information on these drivers in an official Docker network documentation on this link.
By using a command Docker inspect we can see all the settings for one container, but if we add an option --format we can filter the result that docker gives. For example, if we want to see IP address of the container named proxy, we can do that by using the following commands:
- Running of a container:
docker container run --name my-nginx nginx - IP address of the container:
docker container inspect --format ‘{{.NetworkSettings.IPAddress}}' my-nginx
We will notice that there is a difference between IP address of a container and IP address of a local machine. This happens because the address of the container is in Docker bridge’s network. In the picture below, we can see what connecting Docker container to the Internet looks like:
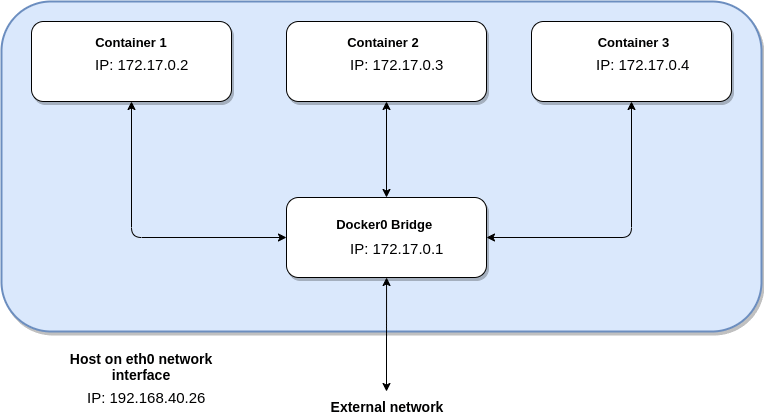
As we can see in the picture, all three containers have been run and each container has its own IP address. Host is a computer where Docker is installed. Interface named eth0 represents the exit to external network, which is the Internet in most cases. Why is there a difference between IP address of a container and a host? Why each container’s IP address begins with 172, while IP address of the computer where Docker is used begins with 192? Because there is a firewall, so to speak, between Docker’s network and external network, that is the Internet. It is there for security reasons and it does natting (NAT- Network Address Translation) of IP addresses. Natting is mapping of one group of IP addresses into the other by modifying the addresses of headers of packets while sending it to the Internet or receiving packets from the Internet.
A network named docker0 that was created by docker in advance is connected on the eth0 interface of the computer and it uses it to get access to the Internet. The main commands with regards to this network are:
- docker network ls - it is used for previewing of all the created networks
- docker network inspect - detailed information regarding one network
- docker network create --driver - creating a network with a specific type of a driver
- docker network connect - adding network to a container
- docker network disconnect - removing network from the container
By adding a container to the network, you automatically assign a specific IP address from the range of IP addresses which that specific network supports. We can see the range of IP addresses when we make inspect command. You can find information about Subnet and Gateway in IPAM section.
Another network that was created in advance is the network called Host. Host network is different from bridge network because it doesn’t have virtual network nor it does natting. It is actually directly connected to the interface of the computer, that is to eth0 interface. This kind of network has its own advantages and disadvantages. The downside is the lack of one security level which is obtained through a virtual network. However, performance is improved.
The third type of network docker created for a user in advance is the network named none and the driver named null. None network is not connected to any interface. The command for creating the network for a specific driver is:
docker create network test-network
- We can specify which network we will add that container to during the process of creating the container.
- We can make an additional command where we will add the container to the network after creating the container and the network.
The first option:
docker network create test-network
docker container run --network test-network --name nginx nginx
The second option:
docker network create test-network
docker container run --name nginx nginx
docker network connect test-network nginx
The difference is not only in the number of commands that should be made. Apart from this, in the second case, the container named nginx is located in two networks, in already created bridge network and in a newly created test-network. This means that we have to make additional command in order to remove the container from the bridge:
docker network disconnect bridge nginx
There is a large number of options for creating a network by using Docker. Using the network with a bridge driver will provide us with another level of security which in most cases will be useful, especially if all the applications have been started on one computer in one network. In this case we will not have any problems with ports which have already been opened for some other reasons, and not because of the applications which have been started, which means we are already protected against unwanted system intrusions. This means that we can easily see which ports have been opened, and the opened ports in docker network are only the ones which the user specified and not any other. The users can also see opened ports on the computer without Docker, but for programmers who are not familiar with Linux systems and Windows systems it would be much easier to do that by using one Docker command in the terminal for any kind of operating system.
DNS in docker
It is very important to know that the user must not rely on IP addresses of the container in the network taking into account that they are dynamic. This is why it is crucial to use the names of containers, because the containers are constantly being run, destroyed, moved and alike which means that IP addresses are constantly changing. We cannot even be sure that an IP address will be the same after one minute, because the container might get destroyed or some mistake might cause the container to stop working. This is when Docker will make sure to run a new container, but we cannot know what IP address it will use. That’s why Docker uses DNS (Domain Name System).
In an already created bridge network, containers can find one another only through an IP address, while the network has automatically supported DNS option in the network that users create. This means that the containers can also be found via name, and not only through an IP address. If a user has two containers, one is called mysql and the other is called web-app, a web-app container will be able to access mysql by calling mysql with the port 3306, that is mysql:3306, if mysql has been run on its default port 3306.
To test this, we will run 4 nginx containers, two of which will be attached to default bridge network, and the other two which we will attach to a new network we will create.
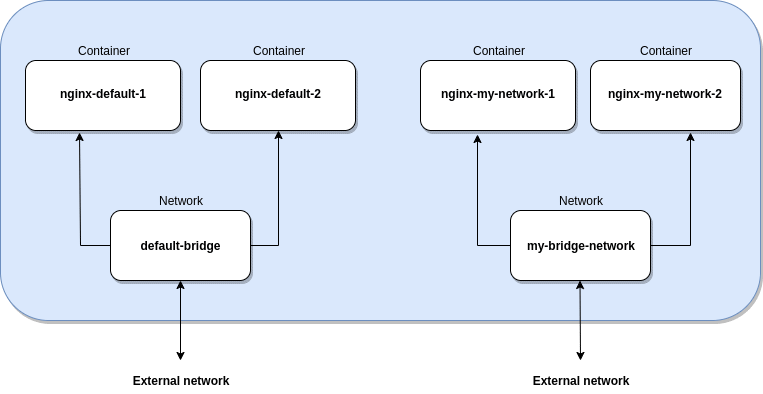
docker container run -d --name nginx-default-1 nginx
docker container run -d --name nginx-default-2 nginx
By making inspect command upon default bridge network we can see that a newly created nginx-default-1 and nginx-default-2 are located in that network.
docker network inspect bridge
Now we will create two new containers and a new network which they will be attached to.
docker network create my-bridge-network
docker container run -d --network my-bridge-network --name nginx-my-network-1 nginx
docker container run -d --network my-bridge-network --name nginx-my-network-2 nginx
Inspect command over a newly created network will show us that two containers, nginx-my-network-1 and nginx-my-network-2, are connected to that network. To test the communication between the containers we have to connect to each of the containers and install iputils-ping packet by using the following commands:
docker exec -it nginx-default-1 bash
apt-get update && apt-get install iputils-ping
After we have successfully installed iputils-ping packet on each container, we can try to ping containers one with another by using docker exec command.
docker exec nginx-default-1 ping nginx-default-2
The answer will be: “ping: nginx-default-2: Temporary failure in name resolution”. This means that these two containers do not see each other in default bridge network.
docker exec nginx-my-network-1 ping nginx-my-network-2
The communication testing between the two containers which are attached to the bridge network which we have created resulted in a successful communication, which we can see in the answer we have received in the console.
*In the next blog post, I will cover Dockerfile and compose, so stay tuned...